How to correctly replace a wheel on a trailer?
Changing the wheels on a trailer is a task that requires the right knowledge and skills. Screwing the wheels on safely and correctly is essential to ensure that trailer is stable on the road. If you do not know how and with what to replace the wheels on your trailer correctly, you should definitely read our article.
When to replace a wheel on a trailer?
Wheels may need to be replaced for a variety of reasons. The most trivial is catching a flat tire on the road. However, tyres also need to be replaced or removed when they become severely damaged or during scheduled maintenance. Whatever the reason, it is important to carry out this process thoroughly and carefully to ensure safe driving and avoid unpleasant incidents on the road.
How do I prepare to replace the wheels on my trailer?
Changing the wheels on your trailer can be done yourself, but if you are unsure of your skills or if you have any doubts, it is always worth enlisting the help of a professional vulcaniser. A good wheel replacement is an investment in the safety and long-term performance of your trailer, so it's worth paying the necessary attention and care during the process.
If you have decided to replace it yourself, prepare a toolkit to help you carry out this task efficiently and safely. Here are a few that we recommend:
- Wheel spanner. The wheel spanner is the basic tool for loosening and tightening the wheel fixing bolts. A standard wheel spanner is usually included on most cars.
- Torque spanner. This is an extremely useful tool for precisely tightening bolts to a set torque. This avoids over-tightening screws too loosely or too tightly, which can lead to safety problems.
- Lever. In order to raise the trailer and allow the wheel to be changed, it is necessary to have a suitable leveller. These tools allow you to raise the trailer to a sufficient height so that the wheel can be easily removed and fitted. The standard lever that we usually carry in our luggage racks will be suitable for smaller, so-called lightweight trailers. For heavy trailers, it may not be sufficient.
- A hammer and possibly a torch if you are changing a tyre after dark. These tools may or may not be useful. A hammer can be used if the wheel has 'jammed' on the hub due to corrosion of the adjacent hub and wheel. Keep in mind, however, when using a hammer be careful not to damage other trailer components.
- Ein Hammer und möglicherweise eine Taschenlampe, wenn Sie nach Einbruch der Dunkelheit einen Reifen wechseln. Diese Tools können nützlich sein oder auch nicht. Ein Hammer kann verwendet werden, wenn das Rad aufgrund von Korrosion der angrenzenden Nabe und des Rads an der Nabe „festsitzt“. Denken Sie jedoch daran, bei der Verwendung eines Hammers darauf zu achten, dass keine anderen Teile des Anhängers beschädigt werden.
Keep in mind that, in addition to the tools mentioned, it is also important to carry additional parts, i.e. a new wheel, fixing bolts, nuts, etc., if they are required in the event of wear or damage to parts. With these tools ready, you can start replacing the wheel.
Replacing a wheel on a trailer - step by step
Before you start work make sure the trailer is parked on a flat and stable surface and switch off the vehicle engine. If you are replacing a wheel on the road keep in mind to properly mark the vehicle by setting up a warning triangle and then:
- Place wheel locks to prevent unwanted rolling of the trailer. The lock should be placed at the opposite end of the trailer to secure the front or rear.
- Before removing the wheel, loosen all the bolts with which it is attached using a wheel spanner.
- Use a lever to raise the wheel above the level of the ground on which the trailer is standing. NOTE: Make sure you use a lever with the correct lifting range and sufficient strength.
- Once the trailer has been raised, unscrew all the bolts on the wheel and set aside.
- Remove the unscrewed wheel from the hub and set aside.
- Place the wheel on the hub and align the hub and rim holes concentrically.
- Screw the wheel to the hub by hand, using the bolts that were previously removed.
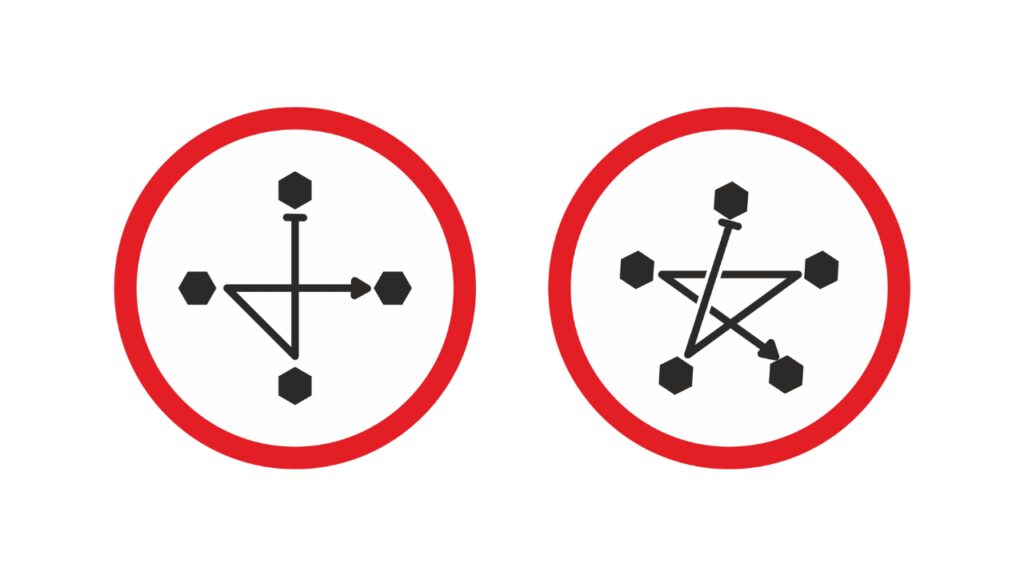
- Ziehen Sie die Radschrauben mit einem Drehmomentschlüssel gleichmäßig an. Stellen Sie zunächst den Schraubenschlüssel auf 40 Nm ein und ziehen Sie ihn in der in der Abbildung unten gezeigten Reihenfolge fest. Wiederholen Sie den Vorgang und stellen Sie den Schlüssel auf 70 Nm und dann auf 100 Nm. Denken Sie daran, dies jedes Mal in der im Diagramm unten gezeigten Reihenfolge zu tun.
- Once all the bolts have been tightened, check the torque on the torque spanner to ensure that the recommended range of values has been reached.
Keep in mind: after driving 50 km, check the tightness of the bolts using a torque spanner.
See how to replace a wheel on a trailer
Which spanner should I choose to tighten the wheels on a trailer?
Why use a torque spanner rather than an air or other impact spanner to tighten wheels? Because:
- An impact spanner (e.g. electric or pneumatic) may generate too high a tightening torque. If the torque is too high, there is a risk of damaging the bolt, deforming the rim or damaging the threads in the hubs. Incorrectly tightened wheel bolts may lead to wheel run-out, which has a detrimental effect on driving safety and vehicle stability on the road..If used to over-tighten wheel bolts, there is a risk of exceeding the recommended tightening torque. Over-tightened bolts can cause deformation of the rims or loss of wheel balance, which in turn affects driving safety and stability.
- An impact spanner works quickly, but it is difficult to control the tightening torque with it, especially if you are inexperienced in its use. Lack of precise control over the tightening torque can lead to uneven tightening of wheel bolts, which in turn can affect the balance and stability of the trailer.
- Too much torque generated by an impact spanner can lead to damage to the threads on bolts, hubs or wheel bores. This, in turn, can make it difficult to remove bolts later during the next wheel replacement or lead to the need to repair or replace damaged parts.
- When replacing wheels on a trailer, precision is crucial for safety. Bolts that are too loosely tightened can come loose while the vehicle is in motion, leading to the risk of losing a wheel. On the other hand, over-tightened bolts can indirectly lead to damage to brake or suspension components. By using a torque spanner, which allows you to precisely set the right torque, you minimise the risk of such problems.
To summarise...
Changing the wheels on a trailer is a task that must be carried out with care and precision. Screwing the wheels correctly is crucial for road safety, ensuring driving stability and minimising the risk of breakdown. By carrying out a wheel replacement on your trailer according to the above tips, you can enjoy a relaxed and safe journey, confident that your trailer is in perfect working order. Also keep in mind its regular maintenance and inspections to keep it in the best possible condition.